
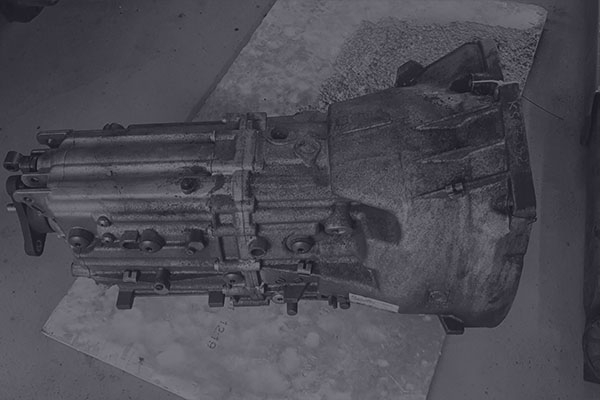
Manuaalkasti avamine on alati suhteliselt hirmus ettevõttmine eriti veel olukorras kus igasugune info puudub nii varuosade kui ka jupitamise kohta. Aasta tagasi lappasin netis ringi kuna kast koda oli vaja projekti raames kastist eraldada ja seda kujul kus hiljem oleks olnud võimalik see tagasi panna. Kes surust suure HEPA tala ja m20 keermelatiga, kes lõi nsm haamriga jne.- lahti said nad kõik selle kasti aga tegumood oli omamoodi brutaalne ja kokkupanekut ei demonstreerinud keegi ei kirjas ega ka videos, seega ma olin pimesi oma murega. Pimedas kombadest õppisin nii mõndagi ja suutsin isegi ZF tehasest natuke infot välja sebida mida kavatsen, siin teiega kohe jagada.
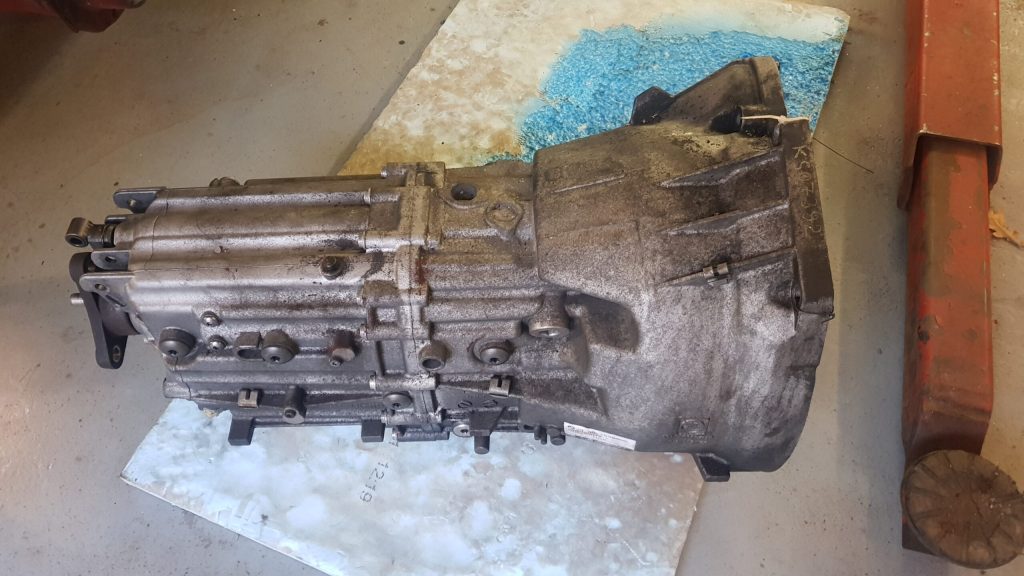
Siin postituses üritan kirja panda oma nägemuse võimalikust valutust lahti monteerimisest. Alustuseks üritan kirja panna siia listi mis tööriistu võib antud töö juures vaja minna:
- Torx 30, 45 & 50
- Poole tolline narre
- Poole tollise narre pikendus
- Njuuton võti mis annab välja 20 Nm
- Sirged lukustusrõnga näpitsad
- 17 või 18 pardrun (mälu veab alt siin kohal)
- Tööstuslik föön
- Rellakas
- Infrapuna termomeeter
- Mugavuse pärast simmeri eemaldus tööriist
- Lapik kruvikeeraja
- Võimaluselt riistad tõmmitsa tegemiseks aga kui kannatust jagub, siis peaks käigukastikoda teoorias olema võimalik eemaldada ka laagrite kuumutamise ja võllile koputamise teel. (laagrirumm tahab saada iseaalist 110 kraadi et asi lihtsalt liikuma hakkaks)
Varuosade nimekirja panen siia inglise keeles kuna nii on asju lihtsam leida ja tellida:
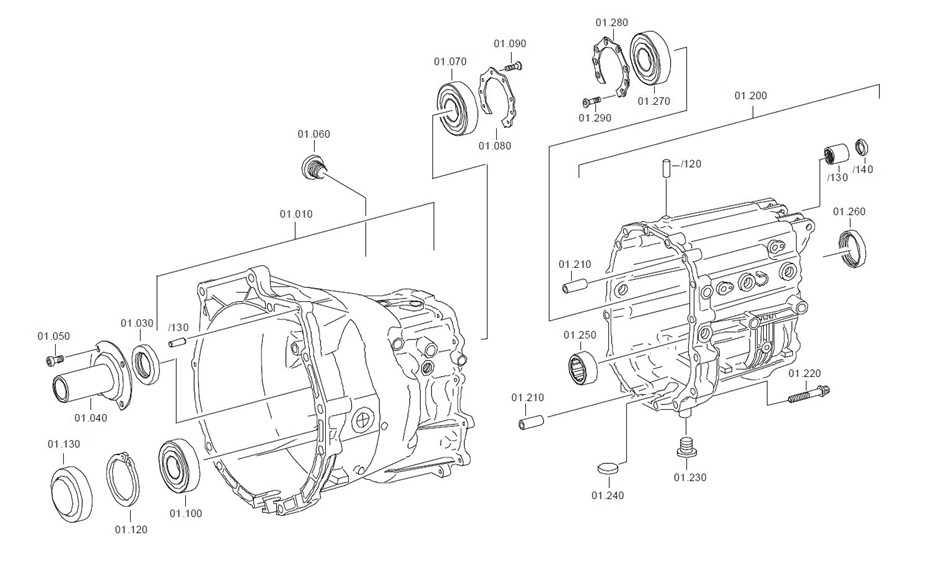
- Sealing cap with original ZF spare number 0501 317 873* as shown on Diagram No.1 with number 01.130 (price aprox 8 euros)
- Shaft seal with original ZF spare number 0750 111 403* as shown on Diagram No.1 with number 01.030 (price aprox 10 euros)
- Ang. Cont. Bearing with original spare number 0735 340 180* as shown on Diagram No.1 with number 01.100 (price aprox 60 euros)
- Ball bearing with NTN code 6308X35CS26 (you can find this roller bearing from any decent bearing dealership for 25 euros aprox. On diagram marked as 01.070.)
- Some liquid gasket (Victor Reinz is one of the best out there with price tag aprox 10 euros)
- Oil BMW MTF-LT-2 1.6 liters.
NB!
Varuosad mille järgi on * soovitan tellida otse ZF tehasest! Eestis esindab ZF’i KGK grupp. Kuullaagri saab lihtsa vaevaga suvalisest laagri poest ja siinkohal soovitaks vaadata SKF’i tooteid.
Katsume siis asjaga algust teha! Nagu iga korralik käigukast ikka peaks ka antud kastis õli sees olema, seega alustame õlipunni täitepunni 01.230 koos põhjas paikneva drenaazipunni eemaldamisega. Õli soovitan lasta puhtasse anumasse- igasugused metalli laastud võivad juba varakult anda mingi aimduse kasti konditsioonist. Eemalda polt 01.050 koos juhthülsiga 01.040. Simmerid 01.030 & 01.130 hävivad laiali võtmise käigus kindlalt, seega võib sinna tuimalt kruvikeerajaga augud sisse lüüa või sobib ka puurimine. Auke saab ära kasutada tõmmitsa rakenduspunktidena.
Peale simmerite eemaldamist pääseb ligi nii lukustustrõngastele kui ka alumise võlli poldile mis tuleb samuti eemaldada enne edasi minemist.
Ennem kui koda kangutama hakata tuleb veel eemaldada paar polti jne.:
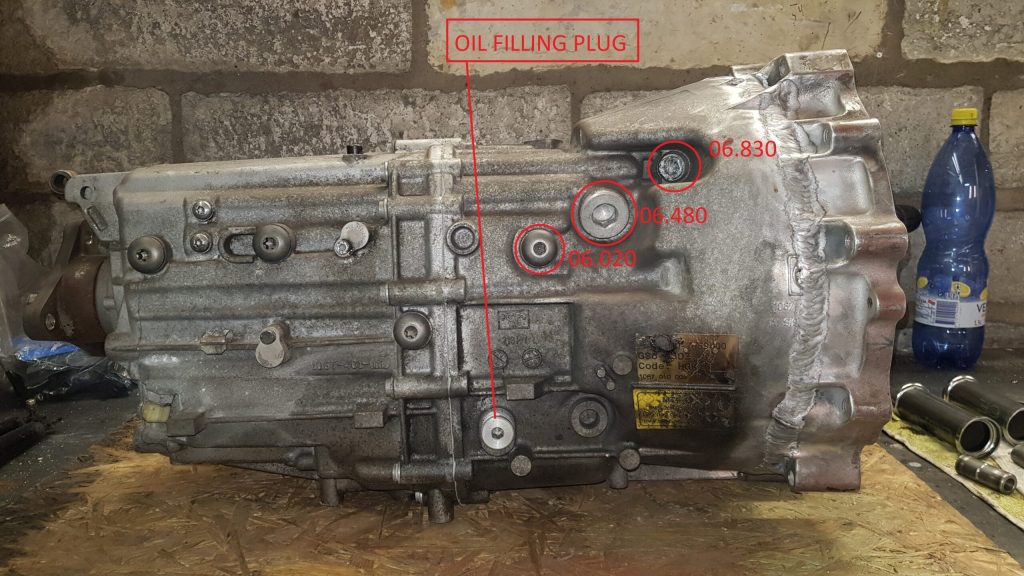
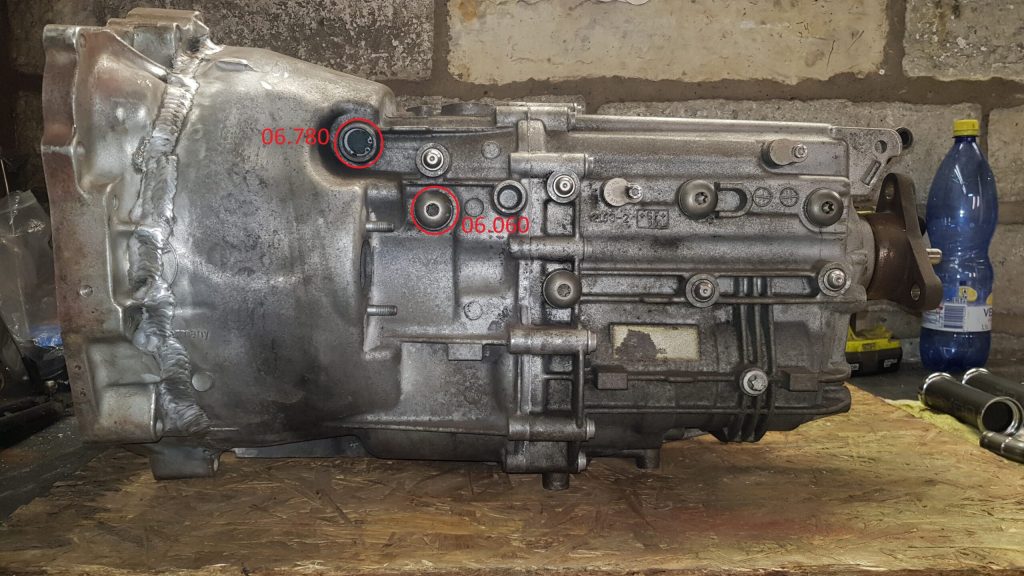
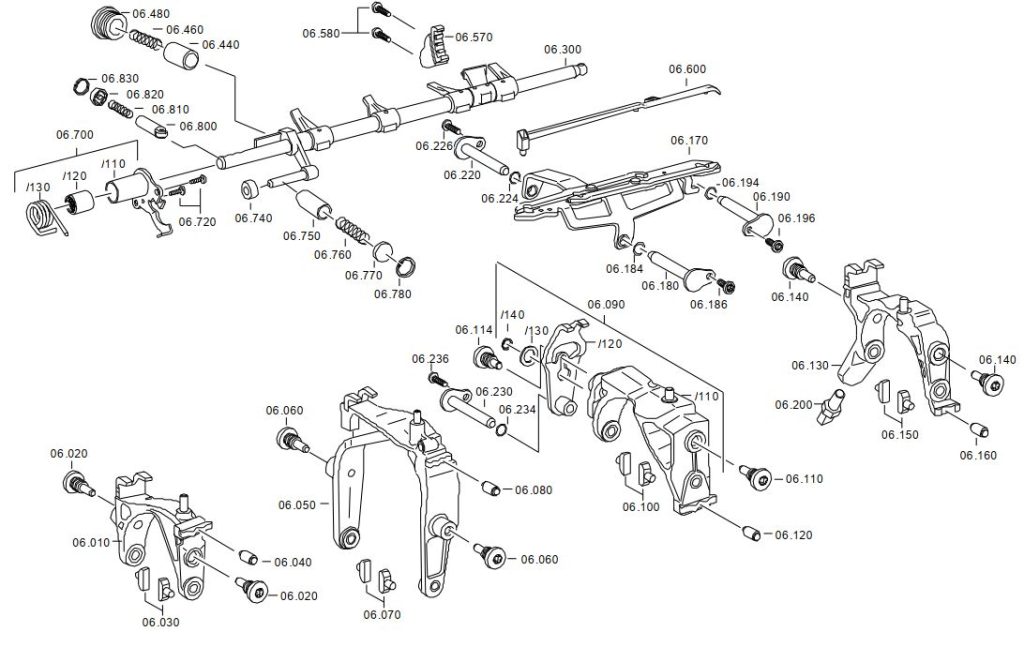
06.060 ja 06.480 tulevad lihtsalt ära (480 alt tuleb välja vedru koos tiftiga), lihtsalt keerake nad välja ja olemas. Korgid 06.830 ja 06.780 on juba teisest puust ja ilma puhastuseta ei saa ilmselt arugi mis seal täpselt toimub seega tuleks alustada sellest- brake cleaner teeb oma töö. Peale puhastust tulevad välja väiksed lukustusrõngad mis istuvad kasti korpuses- piisava õnne korral hüppab kork vedru surve abil ise välja kui need eemaldada. Kui nii palju õnne pole siis tuleb kahe väkse kruvikeerajaga kaasa aidata kuni kord liikuma hakkab. Kork eemaldatud, eemdaldage ka vedrud.
Nüüd on see moment kus õige lõbu alles algab! Mainisin ka eespool, et antud kasti on võimalik laiali pressida kas siis julmalt jõuga või andes sooja vajalikele detailidele. Antud juhul ehitasim ma rakise mis oli võimeline survet avaldama nii ülemisele kui ka alumisele võllile korraga nagu diagram No.3’l näidatud. Surudes ainult ühte võlli kahest, hakkab kast kiiva kiskuma ja seda me ei taha. Rakist ehitades tuleb meeles pidada, et mõlemad laagrid istuvad pingistuga oma kohal, seega jõud lähevad pressides päris suureks.
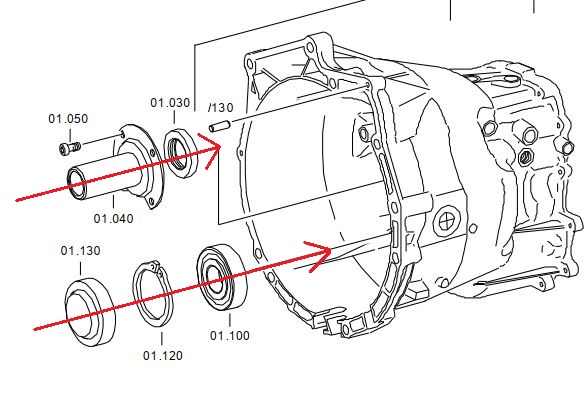
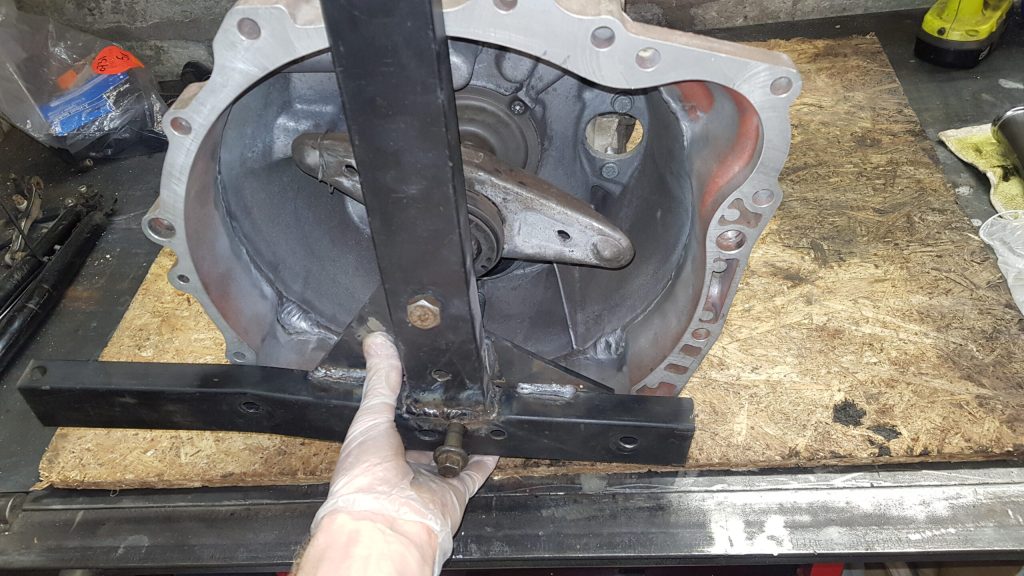
Poldid pressivad otse kasti võlli otstele, seega oleks soovituslik vahele panna seib, mehaaniliste vigastuste vältimiseks!
Juhul kui kannatust peaks üle olema ja ajaga pole kiiret, siis võib ka kuumutamise abil proovida. Metallil on omapärane võime paisuda kuumutades ning seda annab ka antud juhul ära kasutada. Idee kohaselt tuleks mõlemale laagrile nii palju kuuma anda kuni laagri rumm saavutab maksimaalselt 120 kraadi mille tulemusena rumm paisub piisavalt et lasta võllist lahti. Kui on plaan niikuinii uued laagrid panna, siis võib ka üle minna sellest temperatuurist aga mitte meeletult palju kuna kuumus võib ka teisi kasti sõlmi mõjutama hakata- kui laagri plastik kate või määre hakkab välja sulama, siis tasub kuumusega tagasi tõmmata. Oluline on ka kuumus otse juhtida laagri rummule ja mitte lasta tal mujale rändama minna. Abi võib pakkuda ka võlli jahutamine sama aegselt külma sprei või märja kaltsuga. Siin kohal oleks hea kui saaks lasertermomeetriga laagrirummu temperatuuri jälgida. Vajalik temperatuur saavutatud, siis võib kasti maha panna ja puu prussi ja haamriga võlli otsa lüüa ise samal ajal lalgadega kasti koda toestades. Piisava õnne korral tuleb kast ka selliselt viisil laiali.
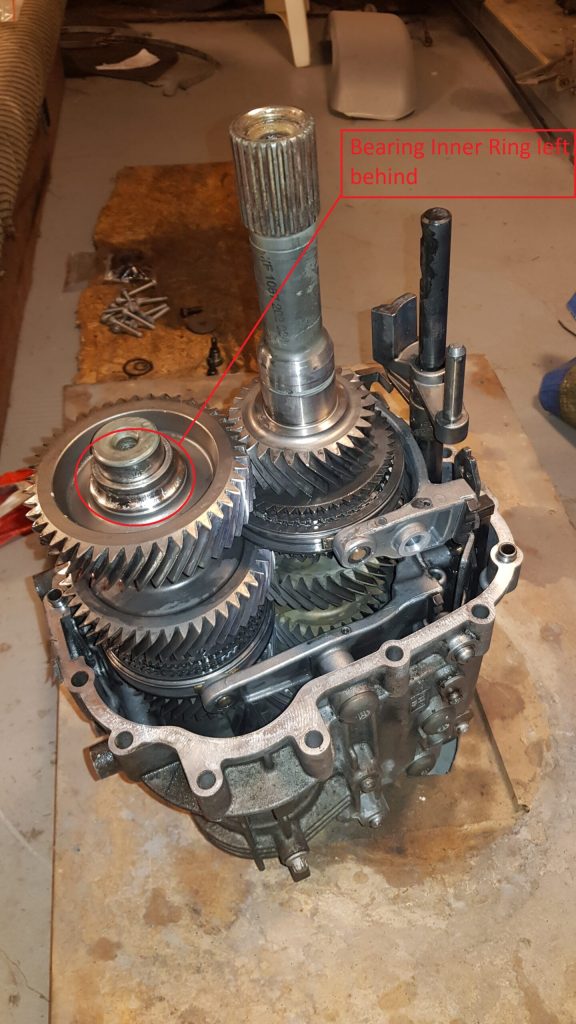
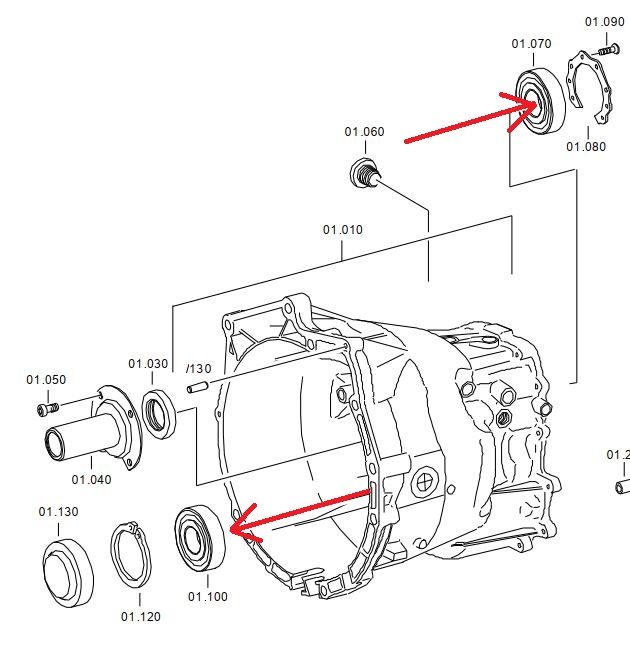
Nii ülemine kui ka alumine laager peaksid kojaga koos ära tulema. Kui on plaan laagreid vahetada, siis tuleb eemaldada kinnitusplaat 01.080 ja laager välja koputada nagu näidatud Diagram No.4’s (koja pesast tuleb laager juba lihtsamalt välja). Teise laagriga 01.100 on juba lood keerulisemad kuna tegu on radiaaltugikuullaagriga mille rumm koosneb kahest osast. Üks rummu poolest jääb oma kohale (nagu näidatud pildil No.5) võllil ja tuleb eemaldada kas kuumutamise teel või toorel rellakaga pragu sisse lõigata ja haamri ningn meisliga prakku lüüa. Rellakaga lõigates tuleks kogu kasti sisu kinni katta, et takistada metalli tolmu levimist sinna kus seda vaja pole ja lõigates tuleks säästa võlli pindmistest kahjustustest. Lõigates pole vaja tervet rummu seina läbi lõigata ja piisab ka ainult praost- kuna rumm istub võllil tolerantsistuga, siis on selle seinas hulgaliselt pingeid mis aitavad kaasa seina purunemisele õigemast kohast.
Olles teinud kõik mis vaja kastiga, tuleb see taskord kokku tagasi ka panna. On põhjust rõõmustada kuna kokku on seda kasti veel hullem panna kui laiali võtta mu meelest. Selleks, et kõik õnnestuks tuleb kõik spetsiifilises järjekorras kokku lapata.
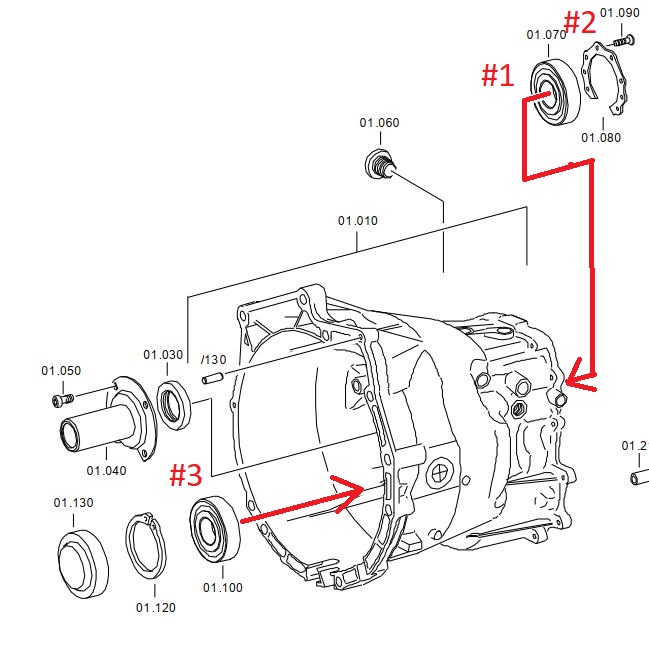
Nagu diagrammil No.5 näidatud, tuleks alustada laagri 01.070 koja pessa panemisega. Laager peaks oma pessa kerge koputusega minema peale mida lukustatakse see pessa spetsiaalse plaadi ja poldidega.
Järgmisena võta laager 01.100 üks sisemise rummu pooltest, kuumuta see 120 kraadini, määri võll õliga üle ja pane võllile nagu näidatud pildil No.5.
Teiselt poolt koda koputa oma kohale ka laager 01.100 mis peaks sama kergelt pessa minema nagu 01.070. Laager paigas, võta küljest rummu teine pool- see läheb paika siis kui koda oma kohal juba.
Enne koja paika panemist tasub ka drenaazi punn puhtaks teha koos selle kasti sees paikneva ümbrusega. Üle soovitan puhastada ka kasti sisu enda.
Koja patagasi paika panemine on minu meelest protsessi üks kõige raskemaid momente. Käiguvahetus hoovastik peab olema õiges asendis ja jooksma otsa pidi koja sees olevasse võlli pessa- enda olukorras pidin kasti 2 korda uuesti lahti võtma kuna hoovastiku võll oli pirtsakas ja läks alati sinna kuhu ta minna poleks tohtinud. Koja tagasi panemisele aitaks kaasa ka soojendamine ja selleks oleks tavis suuremat ahju, et kogu kupatus 120 kraadi peale kütta (prob piisab ka 110 kraadist). Kui on käepärast võtta suuremat pressi, siis saaks idee poolest ka sellega töö tehtud.
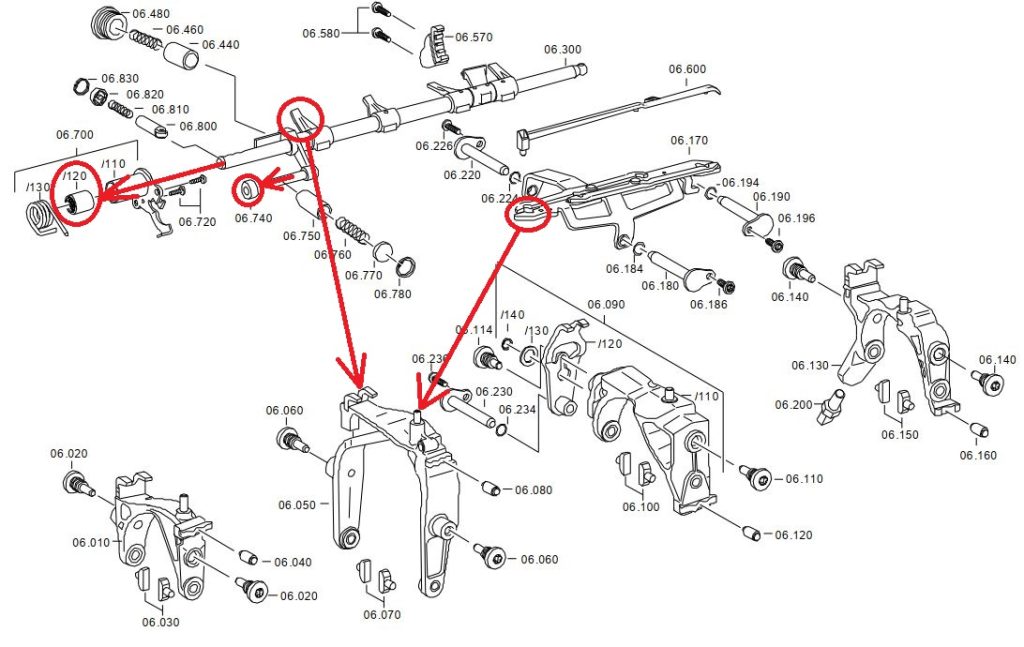
Koja tagasi panemisel ei tasuks unustada korpuse flantsi pindade puhastust ja pindadele tuleks kanda mootori silikooni, et õli püsiks kasti sees. Koda paika pannes veendu et Diagram No.6 näidatud võlli otsad istuksid oma pessa. Digrammi järgi tuleb paika sobitada kronsteini 06.170 otsas olev tift kahvli 06.050 küljes olevasse pessa. Sama kehtib ka võlli 06.300 küljes oleva vardaga.
Kui kodu on leidnud oma tee tagasi originaal kohale siis järgmisena tuleb paika panna alumiinium poldid 01.220, näidatud Diagrammil Nr.1. Kõik poldid soovitan ennem hoolega puhtaks teha koos kasti korpuses olevate keermetega- alumiinium keermed võivad hooletuse korral kiirelt otsa lõppeda! Poldid tuleb pingutada 20Nm’se jõuga tehas seda diagonaalis. Tehase andmete kohaselt ei pea neid polte välja vahetama. Ennem kui siit edasi minna testi ära ka, et kõik käigud läheksid sisse ja käiguhoovastik liiguks ilusti.
Olles koja uuesti liitnud kasti korpusega, tuleks veel oma kohale panna laagri 01.100 puud olev rummu pool- selleks paika pressimiseks saab ära kasutada võlli otsa käivat polti. Kõik ülejäänud läheb kokku algusele vastupidises järjekorras. Enne õliga täitmist tasuks tagasi panna ka drenaazi punn mille pingutusmoment on 35 Nm. Õli sisse, täitepunn külge ja ongi valmis!
Suur tänu kõigile kes võtsid vaevaks seda lugeda! Pildid pärinevad ZF varuosade kataloogist mida ma võin vajaduse korral jagada. Lihtsalt saatke kiri kasutamucustoms@gmail.com kiri ja ma katsun vastata nii kiiresti kui võimalik.
Great write up, thank you for sharing this. I was curious about how to open this up also. Do you have a picture of the inside view of the bell housing half of the case? It sounds like the ideal way to seperate the bell housing is to use a beam and a bolt and use that to press it off the input shaft nose. It sounds like the case halfs are sealed with liquid gasket, no rubber or paper material, would you mind providing the part or description of the Victor Reinz sealant?
What was the reason you had to open it up? replacement of synrchos, bearings, or other parts?
Hi! Thank you for your comment!
Sadly didn’t find any picture from the phone.
For pressing you can use beam but it have to tolerate quite much sideway force and you need to press from 2 points equally- under input shaft there is another shaft nose what is hidden below sealing cap.
If I remember correct than originally there was a gasket from factory but you will be golden with liquid gasket like Victor Reinz sealant or something similar.
The reason why I had to split casing was that gearbox was bolted on Volvo t6 engine and bellhousing had to be welded. You can see some of this progress in my Instagram page: https://www.instagram.com/kasutamu_customs/
Hello you are like my savoir! I’m recently working on rebuilding my GS6-53BZ, may I ask where can I get parts no. 06.160 & 06.120(I assume they are the same?) And if you know the name of the parts in English please tell me also, I live in a country where most of BMWs are automatic haha, sorry for my armature English, look forward for your reply! Thanks
Hi!
Those parts are called “stop bush” in English. Best bet to find one is to source out who is your local Zf dealership in you country- for instance in Estonia it is https://kgk.ee/ . They can ask straight from factory.
Pretty happy I stumbled on your website. Any idea what the 06.080 part number is and how it can be replaced ? It seems like it is pressed in from the exterior of the gearbox ? I have one that has cracked so the spring it contain has popped out and it’s a real head scratcher.
Hi!
Thank you for your comment
You are probably correct- this stop bush is probably pressed into casing of gearbox from outside. I’m not sure how tightly it sits there but you can try to drill out center and then slowly pry out with small screwdriver or something similar.
I will try to send spare parts catalogue via email- there you can check for spare part number and try your luck!
Today i have ordered bearings 01.070 and 01.100 and another parts (sealing cap, oil, sealing ring, …). My transmission makes some noise when clutch pedal is not pressed. when i press clutch pedal to the floor, the rattle sound sudenly stop – probably these bearings. In our state is problem to order these bearings, so i have asked directly NTN. they offer BA2-0023B
35 x 73 x 30 and 6308LLUC3/5K NTN 40 x 90 x 23. They Told me that somebody ordered these bearings exatly for this transmission and it works, so i have ordered these bearing (i know that these bearings aro not directly from ZF, but when it will work, it will be great). Of course, thanks for your legendary write up.
Hi!
Thank you for your comment!
NTN should work just fine.
Glad to hear I can help!
Let me know how it went when the job is done.
Hi, I have the 53DZ gearbox connected to a 71 Ford Mustang 429 making 650hp/750Nm via a Tilton 3 disc rigid clutch. I I noticed that “SNX” wrote that the gearbox makes noise and it disappears when pressing the clutch – the same in my case. The guys driving drifting have experienced the same with a rigid clutch like Tilton 3 disc NASCAR clutch. The noise disappears also when rising up the rpm. I was told by a ZF mechanic that most probably the resonance is coming from the engine itself. The gear shifts as such are clean. In my Mustang the rear axle is rigid and the propeller shaft has an inch gliding action to compensate the suspension movements. The connection to the gearbox is otherwise rigid.
Not knowing how BMW has solved this but it not necessarily is a bearing problem. It would be interesting to hear what “SNX” found out and did he get rid of the resonance in the gearbox.
Sorry for late reply!
Sadly I have no feedback from SNX but it seems to be the deal when u are running rigid setup- vibration and noise have to go somewhere.
Om 606 and bmw gearbox gs6
Same shit, sputtering at idle
Hi Martin,
Thanks so much for your write up with photos and schematics. Really good stuff as I was googling for a while without getting the answers to my question.
Yesterday I was changing the oil on my GS6-53DZ for the first time, and stupidly removed 06.060 instead of the filler cap. I wasn’t paying enough attention. I had to get creative tool-wise to get access to it as well as it’s so close to the trans tunnel in my E88 135i. I don’t have a low profile T50 but used a ratcheting spanner on the shaft of the T50 to crack it and then was able to remove it by hand. I was shocked when I pulled out the pin and realised it wasn’t a plug, but had a tapered shaft with a point on the end. I then felt around and found the correct filler plug and realised how dumb I’d been.
Anyway, I cannot reinsert 06.060 by hand and was hoping I hadn’t messed something up inside the box. Looking at your photos and diagrams I’m thinking I just need to reinstall 06.060 with a low profile tool and I should be ok right? I’m guess the pointed and tapered end of the bolt will correctly locate into the shift fork?
Do you know what torque it needs to be?
Hi!
Thank you for your comment!
Happens to the best!
I believe it’s not so huge problem- there is slight play on the gear lift fork but nothing criminal when one bearing pin is removed. Small wiggle should guide it back to it’s position.
Sadly can’t tell about specific toque specs for that one but if you will measure the thread you can find necessary information from google.
Transmission make some noise when clutch pedal is not pressed the proplem is the bearing 01.070 seal two side 2rs it gets dry then make noise should be 1rs or remove 1 seal inside thé Transmission side the oil Will lubriquateth bearing
You can try to repack the bearing with grease if there is enough room to remove bearing plastic shield
Hi There! Thank you so much for this post…there is not much info out there about the inner workings of this transmission and how to take apart and rebuild. I’m hoping someone can help point me in the right direction here…in draining the transmission fluid from my GS6-53BZ (hopefully it’s similar enough), I found a small snap ring attached to the magnetic drain plug and I’m trying to figure out what part it is before trying to fix myself or find a shop to help. The trans is out of the car but was working well with no noise or issues before removal and i can cycle the gear selector through all gears with no issues now. The OD of the snap ring is 11.89mm and the ID is 9.25mm, smaller than part 06.780. Maybe parts 06.224, 06.184, 06.194, or 06.234 in the diagram above? Thanks so much!!
Hi!
If I’m correct the only difference bedween 53DZ and 53BZ are gear ratios.
Drain plug should not contain any snap ring- part number 01.230 on first scematic.
Part 06.224 should be o-ring installed on quide pin 06.220.
Mabey you can send me a picture about this ring and I will let you knw what I think: kasutamucustoms@gmail.com
Thank you for the quick reply, Martin! I have emailed you a photo. And yes, no snap ring from the drain plug, the snap ring was stuck to the drain plug because I use aftermarket magnetic drain plugs – ironically for this exact reason. I just hoped I’d never find anything on it and thankful I have it or else the snap ring would have just drained right into my drain pan and likely never would have seen/noticed it.
Hello, I’m looking for part 01.250, the roller bearing. I haven’t been able to find it yet.
Could you please give me the reference number for this part? Because it has unusual measurements and must only be sold by ZF, but I can’t manage to contact them, and there are no dealers near me.
It would be a great help if you could provide me with the reference number.
Thanks in advance.
Hi!
Reference number for this one is 0735 298 189
I hope it helps!
I will send catalogue also to your mail!
Bst Rgrds
Ammer
I see lots of complains where people have noise at idle, which disappears when clutch pedal is pressed or when driving. I had the same issue and turned out to be the reverse idler bearing
Hello everyone,
Does anyone have the complete workshop manual for the official ZF? I hear a clanking noise when I release the clutch. It sounds different depending on the release conditions or only if I accelerate under certain conditions. It’s like a “stenk” as if pieces of metal were moving. The dual-mass flywheel was half-marked, and I hope that’s it. The two parts were rubbing because half the flywheel had a long-marked half-flywheel mark. But the gearbox has 430,000 km, and I’d like to open it to check the status. Gearbox GS6-53DZ on Bmw E60 530D.
Hi
There is no workshop manual for this box. This was confirmed by ZF factory in Germany who said that this box is so called maintenance free and due to this there is no workshop manual. But they where kind enough to send me spare parts catalogue- I ill send it to your mail.
Flywheel is probable cause to the clank I believe. You can also change oil of the box and see if there is any metal shavings etc. – if none I don’t believe that there is anything wrong with box itself…
Wow thats awesome thanks! I have to replace the bearing on the input shaft because I damaged its cover whilst replacing the radial seal so this helps tons. Do you happen to have the torque spec for the bolt on the second shaft?
Hi, Martin.
Do you have any information on where I can find all the gearbox parts?
I want to replace the four main bearings with GS6-53DZ.
But I couldn’t find the correct part numbers.
Hi!
I will send you spares cataloque to mail, mabey it helps.
It is quite hard to find spares to this box.
Bst Rgrds
Ammer
Hello my friend,
I installed this gearbox on a 1JZ using an adapter plate. I have a single-mass flywheel and a stock Luk clutch. I got the same knocking/rattling noise while standing still; when the clutch pedal is pressed, the sound disappears. Sometimes it also appears when driving very slowly in second gear.
Could this be the input shaft bearings? Because the gearbox is mounted through the factory transmission mount to the crossmember and chassis, and at the rear through the stock flexible disc, so all the connections are soft and the gearbox is not mounted rigidly.
Could you also send the manual to my email?
Hi!
It seems to be quite normal in this senario- there is quite many people with same issue after this kind of swap. My best guess is that rattling is from clutch setup itselt and not from gearbox.
I will send you spares cataloque with mail.
Bst Rgrds
Ammer
Hello Martin!
If it’s possible, I’d also appreciate it if you could send me an e-mail with spare parts catalog. Thanks a lot!
Hi!
I sent spares cataloque to yout mail!
Bst rgrds
Ammer
Hey Martin,
im currently rebulding my GS6-53DZ and im looking for the other parts from the Backhousing, i have high intrest in the spare parts catalogue.
Kind regards.
Hi!
I will send it with mail.